.: About Me
& Other Stuff
|
|
| .: |
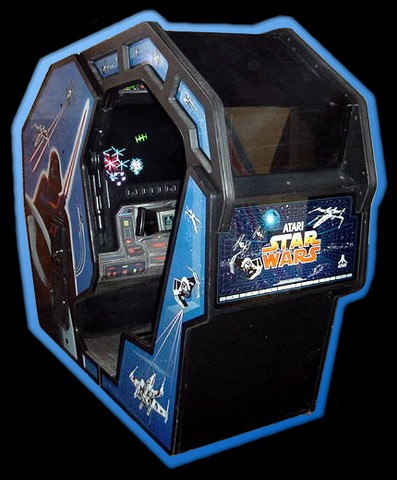
Projects - Star Wars Cockpit
Restore :.
|
|
 |
(Update 24.
May 2018)
Star
Wars Cockpit
- A Restauration in Progress
Current status as of 5.
October 2009
11.
July 2004 - First
Notes
In late 2003 I was lucky enough to get
this nice
machine in Germany on EBAY relatively cheap. The operator
advertised it
as a "Driving Simmulator" (note the two "m"). The wrong spelling,
combined with a distorted
picture in EBAY and not using any of the magic keywords like "Atari" or
"Star
Wars" or even "Vector". Well I was not eager to ask the seller
questions in advance so I simply bid and hoped to get a complete
machine.
What the actual price was? It was well below what I was prepared to pay
-
for ~US$260 I've won the auction.
When I arrived after a 300 miles drive to pick it up, it
showed up in a bad shape.
The machine was probably for many years in an area where they produced
french fries as I found a lot of them inside plus some other dirt and "untouchable" stuff.
The cab was damaged from
moving it around
and has severe
scratches on the sideart. Later at home I noticed that the bottom was
loose as well.
As I anticipated, the 25" Amplifone Monitor had been replaced by a WG
6100, but what made me really happy is that a second PCB set from ESB
(Empire Strikes Back) was lying inside in addition the the Star Wars
PCB set..
Then I started the dissassembly without even trying to switch it on. At
first I removed the Monitor and set it aside. The next step was the
removal of the Power Supply, the Card Cage and the Coin Door Assy.
Afterwards the Yoke Assy, Cabling, Marquee, Lighting .. . . . Then we
had a big cleaning session of all parts before I was access granted to
our house ;-) . Do you know WAF - Womans Acceptance Factor.
The monitor was then cleaned, recapped and tested with my Tempest. So
far it is ready, although convergence is not perfect, a little more
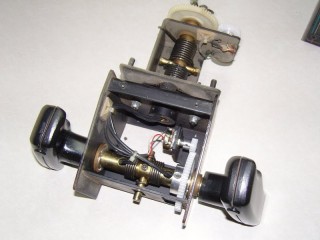
work. Looking after the Flight Yoke was the next step. I found a
rebuild kit
with the buttons and spring at Arcadeshop.com and those microswitches
at a
local electronics supplier. The gears are still in great shape. The
yoke still needs
to be cleaned, paint/rust removed and freshly painted.
After that I dissassembled the Cab itself, as it is in such a bad shape
that I will rebuild many of the particle board parts. Also I have made
contact with someone who wants to reproduce the sideart soon.
So the current status of my "Star Wars" is more or less
"dissassembled".
30.
January 2005 - No
progress
Time goes by...nothing done :-(
1.
December 2008 - All
PCB's rebuilt
Let's have a look at the progress...
Monitor
- The WG6100 19" monitor has been sold to Marco, a friend in Italy, to
restore his Tempest. The reason for letting a 19" Vector Monitor go, is
that I really wanted to have this Cockpit run with the original 25"
Amplifone and as I've got from Marco also a WG6100 deflection yoke back
as a trade-in, I can rebuild the Amplifone.
Getting the parts for the Amplifone has not been found so
difficult so far. From EBAY I've bought a Deflection PCB and a
HV PCB.
Both PCB's have been re-capped, all semiconductors have been
checked/replaced, the connectors have been checked, all solder joints
reflowed after removing old solder and then finally the PCB was
cleaned. For the infamous "red is dead" HV transformer there is replacement
available now, so this caused no headaches any longer, like back in
2004. The yoke, as said above, I've got already.
Still missing is the 25"
Tube,
designated as A63AAX00X (discussions in the newsgroups say, a A63ABZ26X
will also work). I contacted Scotty from
www.hawkeyepicturetube.com and he is able to supply a tube, although
shipping will cost a premium to Europe... so I will try to arrange that
with the family budget :-) in December 2008.
Finally, the degauss coil
is a missing piece. With a limited effort, I think this can be built. A
friend measured the resistance of the degauss coil on an original unit
and I have bought already the required isolated wire.
PCB
Set - While
repairing a Starwars PCB set for another collector, I took the
opportunity to check my SW and my ESB set. The SW boardset showed up
with no issues at all (positive surprise) and I was able to repair my
ESB
boardset. It had a defective AVG, a defective sound RAM plus two
defective 74LS244 for the switch inputs. Still need to order an AVG
chip replacement. Have no spare for that one. The AR2 board
has
also been verified.
Wiring
Harness - Has been cleaned and checked.
Cabinet - No
progress on that. Originally I wanted to get Archer McLean's SW Cockpit
Sideart. But then this delayed more and more and finally I think it
won't get done any more. Unfortunately, while waiting for Archer's,
I've missed the point in time when there was still Cockpit artwork
available from www.mamemarquees.com.
Lucas Arts, so it was said, asked for stopping the SW Cockpit artwork
production. So there I stood, w/o any artwork and with a Cockpit in
pieces. The current plan is to re-use the Cockpit parts inc. the
artwork and rebuild the cab during next summer (2009).
Summary
- All electronics are checked. I need a picture tube
& some time to rebuild the cockpit.
5.
December 2008 - There
is hope for Artwork
 It's
really unbelievable, a story almost too good to be true and that I just
became aware of : The original Atari artwork films for the Star Wars
Cockpit have shown up. Scott Evans (www.atarigames.com)
lend the films to Rich from thisoldgame.com
and Rich is planning to reproduce the artwork as time allows. If you
want to dig into this story, take a look at the article on www.rotheblog.com.
With the artwork eventually being produced (and even if it takes a year
or so), one major hurdle is removed. Initial guesses are around $250
for a complete set of artwork.... It's
really unbelievable, a story almost too good to be true and that I just
became aware of : The original Atari artwork films for the Star Wars
Cockpit have shown up. Scott Evans (www.atarigames.com)
lend the films to Rich from thisoldgame.com
and Rich is planning to reproduce the artwork as time allows. If you
want to dig into this story, take a look at the article on www.rotheblog.com.
With the artwork eventually being produced (and even if it takes a year
or so), one major hurdle is removed. Initial guesses are around $250
for a complete set of artwork....
21.
December 2008 - New
25" picture tube arrived
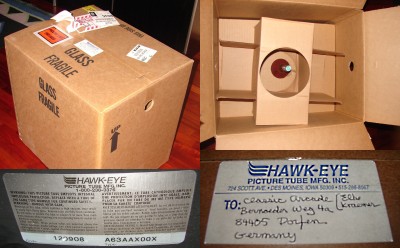 I was close to give it up,
but now, after having the sideart being
reproduced and after shuffling around the budget, I was ordering a
picture tube! Thanks to Scotty from www.hawkeyepicturetube.com,
I was able to order and receive a new A63AAX00X 25inch/63cm picture
tube. Price
for the tube was only $165 ( but don't ask for shipping to Europe :-)
). On top of shipping there was customs and carrier bill for just
storing the package aside for 5 days, horrible fees! But all things are
complete and we're going to re-build the Cab in next summer. I was close to give it up,
but now, after having the sideart being
reproduced and after shuffling around the budget, I was ordering a
picture tube! Thanks to Scotty from www.hawkeyepicturetube.com,
I was able to order and receive a new A63AAX00X 25inch/63cm picture
tube. Price
for the tube was only $165 ( but don't ask for shipping to Europe :-)
). On top of shipping there was customs and carrier bill for just
storing the package aside for 5 days, horrible fees! But all things are
complete and we're going to re-build the Cab in next summer.
14.
April 2009 -
Yoke Rebuild Kit (produced by RAMCONTROLS)
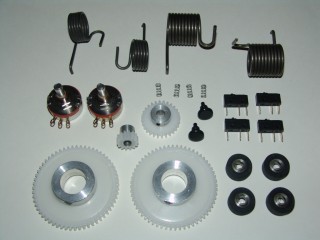 Really things are moving now in
terms of reproductions for the Star Wars Cockpit. Really things are moving now in
terms of reproductions for the Star Wars Cockpit.
RAMCONTROLS
is producing spares for all major ATARI controllers, one of them being
the Star Wars Yoke. David Adams, the owner of RAMCONTROLS is dedicated
to only the highest quality standards when designing &
rebuilding
stuff.
Have a look at his site to read his Project Blogs.
During the introduction of Yoke spares David offered a dumping price on
a 'wear parts' kit (deluxe version!) with all the gears, springs,
switches, bumpers etc to overhaul the Yoke (see picture).
Btw there is an excellent tutorial about rebuilding the yoke with the
super deluxe kit from RAMCONTROLS <here>
.
5.
October 2009 - Cabinet
Rebuilding - Base Assy
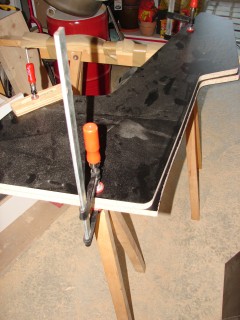
 The last couple of weeks I have put together my
shopping list of black covered particle board and plywood mainly, wood
glue and particle board screws. Having the original cab as a reference
made things pretty easy. I have first build the bottom frame from 3/4"
(19mm) plywood, only challenging thing was to cut the various angles,
as I don't have a circular hand saw The last couple of weeks I have put together my
shopping list of black covered particle board and plywood mainly, wood
glue and particle board screws. Having the original cab as a reference
made things pretty easy. I have first build the bottom frame from 3/4"
(19mm) plywood, only challenging thing was to cut the various angles,
as I don't have a circular hand saw  so I used a setup/tool where I can cut the
angles with my router. The original rollers (including screws and nuts)
have been cleaned, greased and reused. The bottom part of the base assy
will just be screwed, the upper part with the connecting side strips
are glued together. The large holes for the rollers/wheels were also
cut with a router. so I used a setup/tool where I can cut the
angles with my router. The original rollers (including screws and nuts)
have been cleaned, greased and reused. The bottom part of the base assy
will just be screwed, the upper part with the connecting side strips
are glued together. The large holes for the rollers/wheels were also
cut with a router.
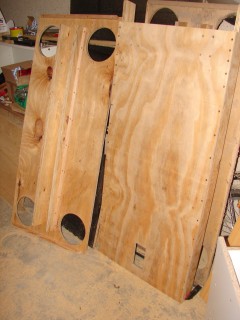
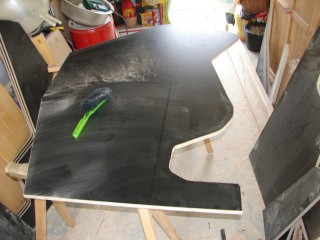
 Trusting in the reproduction of the sideart by
Thisoldgame, I have decided to rebuild the sides and apply the new
sideart when it becomes available. There are two identical pieces for
each side (total 4) plus the arches that I want to re-use. The arches
are in a very good shape and not so easy to reproduce... The arches are
used to connect the large front side with the small rear side ( front
means : in flight direction ). The position of the sides versus base
and arches is guaranteed by additional wood plugs, stability maintained
by screws/glue. The old sides are being kept, just in case. Trusting in the reproduction of the sideart by
Thisoldgame, I have decided to rebuild the sides and apply the new
sideart when it becomes available. There are two identical pieces for
each side (total 4) plus the arches that I want to re-use. The arches
are in a very good shape and not so easy to reproduce... The arches are
used to connect the large front side with the small rear side ( front
means : in flight direction ). The position of the sides versus base
and arches is guaranteed by additional wood plugs, stability maintained
by screws/glue. The old sides are being kept, just in case.
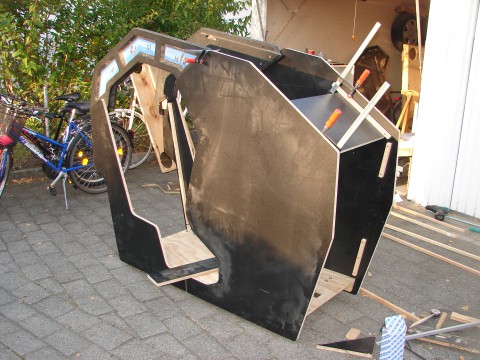
6.
October 2009 - Cabinet
Rebuilding - Assembling Base and Sides
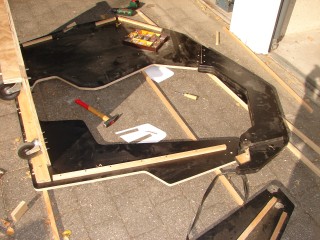 It's time to leave the garage, there's simply
not enough space. The cab will be assembled, lying on its side. Some
wood strips between ground and sides avoid scratches. Starting with the
right side, the three pieces making up one side are positioned and wood
plugs are fitted to be able to take it apart for transportation (just
in case...). Same positioning and woodplugs for the other side. Then
everything is screwed together. The first board that was screwed in
(foot room) gave sufficient stabilty that the cab can now be rolled
around. Looks already like a SW Cockpit, doesn't it? It's time to leave the garage, there's simply
not enough space. The cab will be assembled, lying on its side. Some
wood strips between ground and sides avoid scratches. Starting with the
right side, the three pieces making up one side are positioned and wood
plugs are fitted to be able to take it apart for transportation (just
in case...). Same positioning and woodplugs for the other side. Then
everything is screwed together. The first board that was screwed in
(foot room) gave sufficient stabilty that the cab can now be rolled
around. Looks already like a SW Cockpit, doesn't it?
.... to be continued
»
Star
Wars Cockpit - Local Links
Star
Wars Cockpit - Pictures of Disassembly
»
Star
Wars Cockpit - Web Links
This
Star
Wars Cockpit Restoration story on BYOAC (english)
This
Star
Wars Cockpit Restoration story on ArcadeInfo.De (german)
|
|
|
|
|
|
|
|


